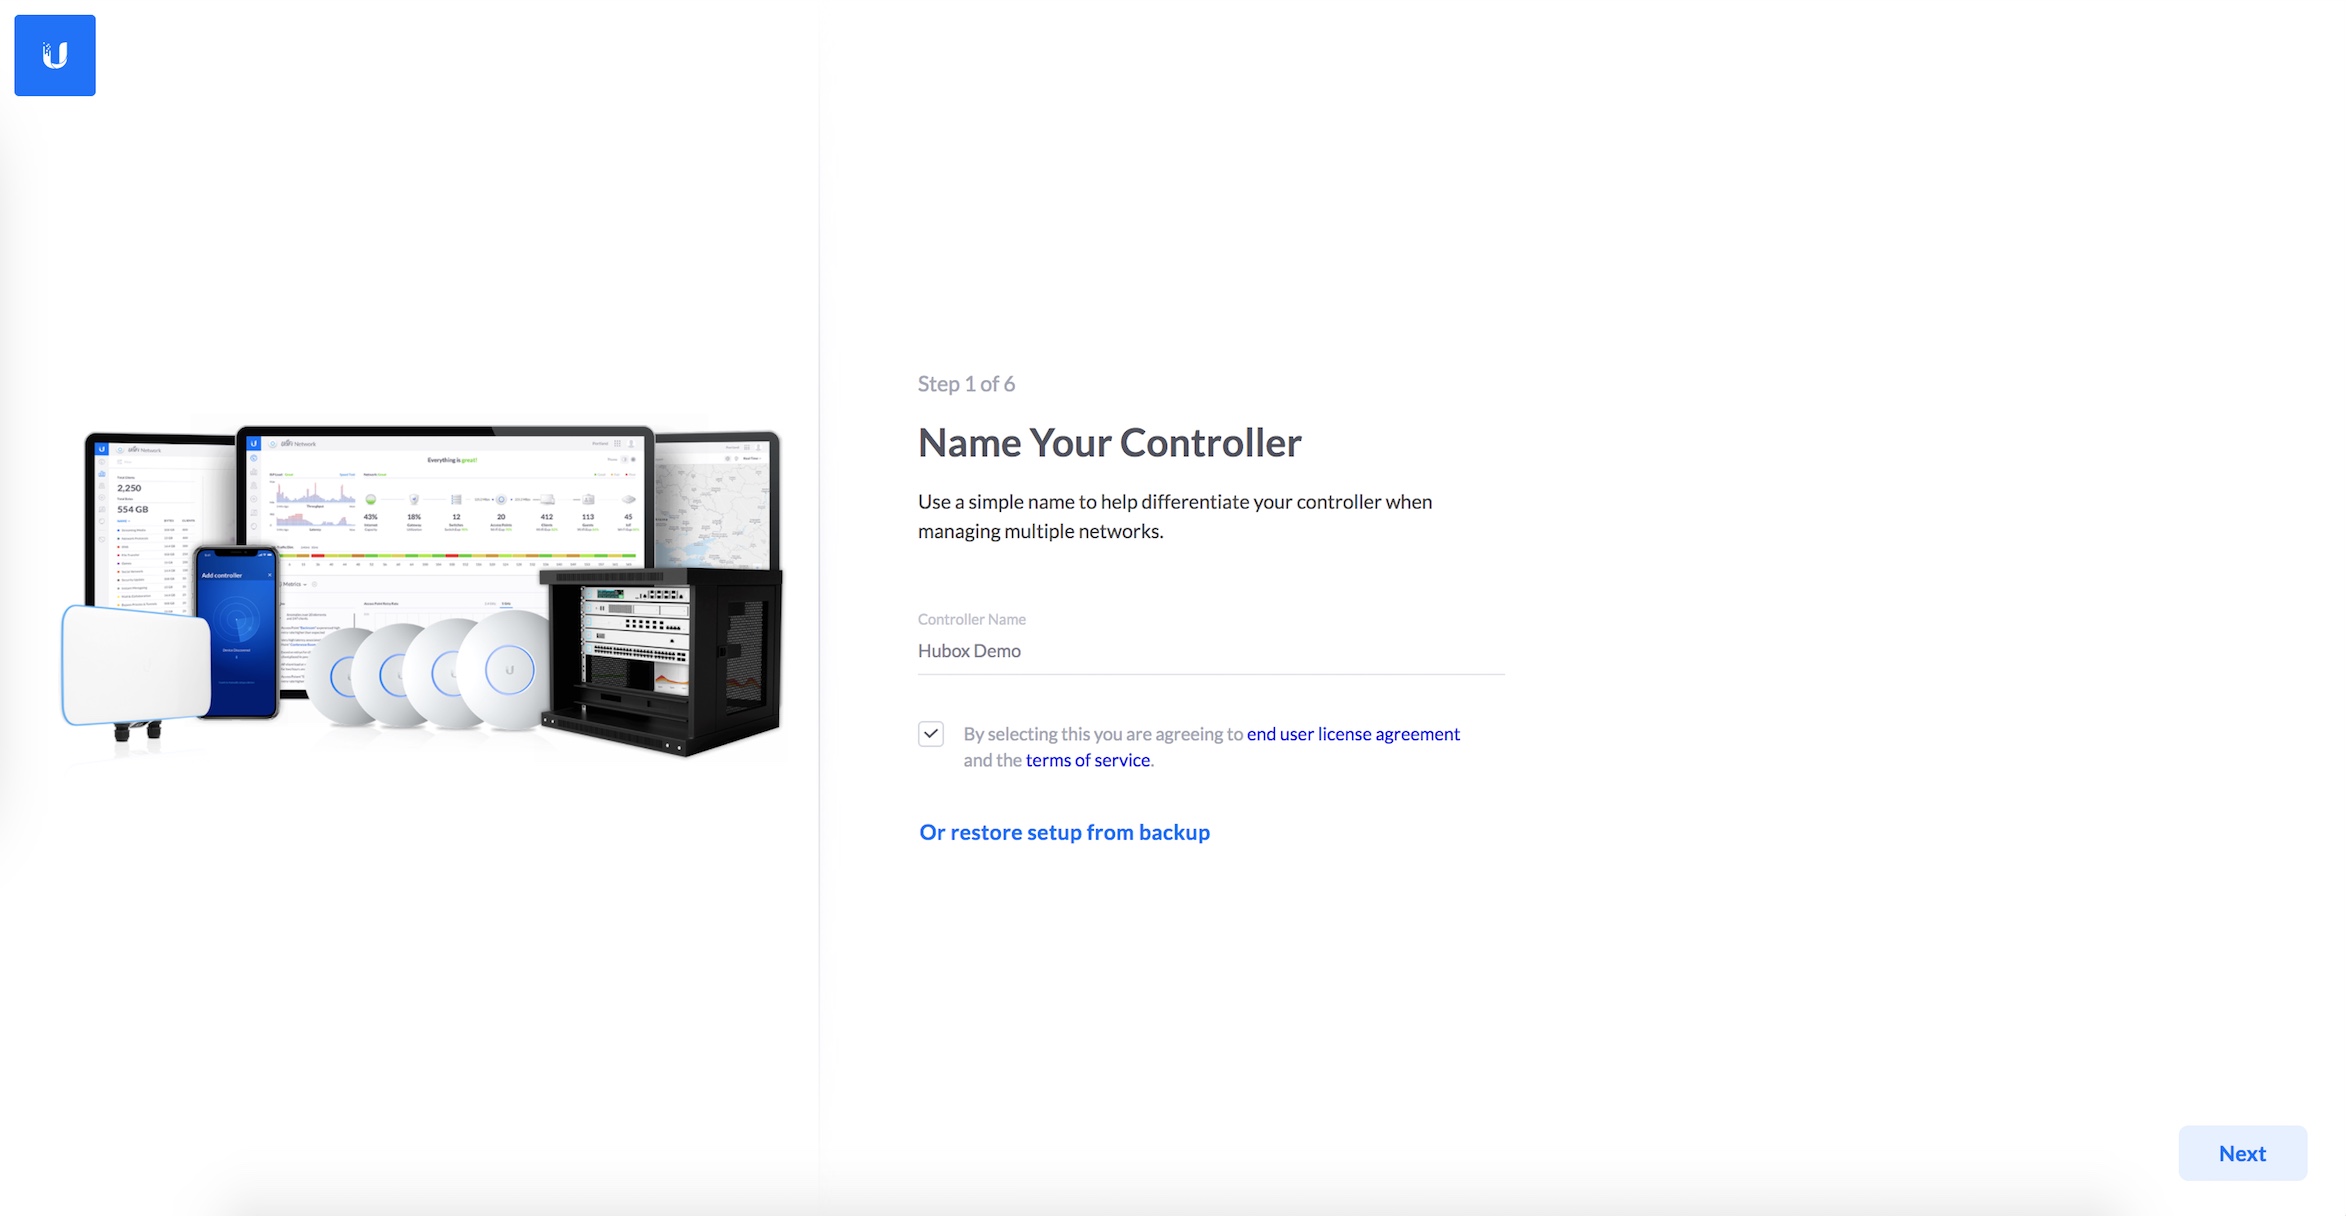
Hubox - Hubox UniFi Documentation

Hubox UniFi (Premium) Documentation

Note: For Hubox Basic plans, please refer to the UniFi Basic plan documentation.

Controller Deployment

With Hubox, deploying a controller is made simple and easy. Click to deploy via our plan selector, and have your controller pre-configured and ready to use within a matter of minutes.

To deploy a controller - if you haven't already - please click the Deploy a controller button below.

Deploy a controller

Controller access

Accessing the controller

To find your controller information, first select your controller on the left-hand drop-down menu within the Hubox control panel.

Controller select

Selecting the controller will navigate you to the controller's Overview page. Here you will find your controller information. In the left-hand menu, links to the View controller and Manage controller pages can be found.

Via the left-hand menu, you will then be able to select the View Controller button to access your controller interface.

View controller

Alternatively, you can access the controller by loading your controller's Access URL in a new browser tab or window.

Access url

Controller setup

Via the controller setup menu, you will be able to name your controller, link your UBNT account, and configure the controller's language and timezone settings.

Unifi setup

Useful Tip:

The most important parts of the controller setup are: naming your controller, linking your UBNT account, and setting your langauge and timezone settings. All other settings can be skipped at this stage and configured later via the controller UI.

Adopting your devices (Via SSH)

To adopt your device to the controller, you will need to follow the set-inform process. This process in-effect informs the device which controller it should be adopted to. The same process should be repeated for every device that you wish to adopt to the controller.

Before attempting to adopt the device, ensure that the device is not still adopted to any previous controllers.

Devices access

To be able to run commands on your UniFi device, you will first need to establish an SSH connection to the device. This will allow you to then check the device information, upgrade the firmware, reset the device, and set the controller URL as the inform target.

To access the device:

ssh ubnt@<LAN IP of device>

The default device password will be ubnt. If you find that that this is not the password, please factory reset the device.

Please note that for certain models of UniFi Security Gateway, you will need to establish a connection to the device with root as the username:

ssh root@<LAN IP of device>

Getting the device info

In order to check that the device information, we will need to run the "info" command. This command will allow you to check the device information.

The device information command (to be run via SSH):

info

The command will input a series of device information datapoints, for example:

Model: UAP-AC
Version: 5.43.38.12731
MAC Address: xx.xx.xx.xx.xx.xx
IP Address: 192.168.1.1
Hostname: UAP-AC
Uptime: 60 seconds

Status: Not Adopted (https://demo.hubox.co/inform)

Among other datapoints, the device information will allow you to check the device status, firmware version, and MAC address of the device.

Useful Tip:

Once the set-inform process has been run, the device status that denotes a successful set-inform process is the status Not Adopted, followed by the controller's set-inform target.

Resetting the device

A hardware reset of the device will reset the device credentials and inform target back to the factory default. It is recommended that you undertake a device reset prior to adoption, as best practice. A hardware reset can also be performed by holding the device reset down for ~20 seconds, following which the device will reboot into factory defaults.

The device reset command:

syswrapper.sh restore-default

The device will default, and the device authentication credentials will be reset back to their defaults.

Upgrading the device firmware

If your device is not running the latest available firmware version, it is recommended that you first update the device firmware in order to ensure sucessful adoption.

The set-inform command:

upgrade <URL of .bin file>

To find the URL of the relevant .bin file, find the latest firmware for your device at: https://www.ui.com/download/unifi

The set-inform process

The set-inform process is a required step in adopting your devices to the Cloud. By setting the Cloud controller as the inform target on the device, the device is made ready for adoption within the Cloud controller.

The set-inform command:

set-inform <Access URL>/inform

To illustrate this, if your controller's Access URL is https://demo.hubox.co:

set-inform https://demo.hubox.co/inform

Following the running of the set-inform command, the device will appear in the Devices tab within the controller as Pending Adoption.

Useful Tip:

There is no requirement to specify a controller port with Hubox. However, if you are required to input a controller port, simply specify 8443.

Adopting devices (Via site import)

Setting up a wireless network within the controller will allow you to create anything from an open network, to a guest control auethenticated network - and then configure your Access Points to broadcast the network.

Downloading the migration file

Download the site migration file (.unf) from your previous controller (in the Classic UI).

Download import file

Uploading the migration file

Upload the site migration file into the Hubox controller via the Current site drop-down menu.

Import site

Click Import Site and then upload the site migration file by clicking Choose file.

Upload import file

Transferring the devices

Return back to the local controller and complete the rest of the site migration wizard to transfer devices across. Use your Hubox controller’s access URL, in the format below (here we use an access URL of https://demo.hubox.co as an illustrative example).

Inform update

Changing the user interface

Controllers running UniFi software versions after 6.0.45 will come equipped with two styles of user interface: the Classic UI and the New UI. Different settings cand controller features can be found in each user interface style, and the user is able to easily switch between the two styles.

Switching to the classic user interface

In the new user interface, navigate to the controller settings and then select System on the left-hand menu. Following this, deactivate the New User Interface switch.

Ui classic switch

Deactivating the switch will prompt a pop-up menu. Click Deactivate.

Switching to the new user interface

In the classic user interface, navigate to the controller settings and then select the User Interface settings tab on the left-hand menu. Following this, activate the New User Interface switch, and then click the Apply Changes button at the bottom of the page.

Ui new switch

Creating new controller admins

New controller admins and read-only accounts can be created within the controller, in order to allow multi-user access to the controller.

In the old user interface

In the old user interface, navigate to Settings and then select Admins on the left-hand menu.

Add admin

Click on ADD NEW ADMIN to be navigated to the admin creation menu. The method of invite and user permissions can be configured as required.

Admin create

In the new user interface

In the new user interface, navigate to Settings and then select Overview on the left-hand menu. Following this, select Administration and then scroll down to the Admins menu.

Admins new

Clicking on Add New Admin will then allow the admin creation menu to pop up.

New admin new

Setting up a wireless network

Setting up a wireless network within the controller will allow you to create anything from an open network, to a guest control auethenticated network - and then configure your Access Points to broadcast the network.

In the old user interface

In the old user interface, navigate to Settings and then select Wireless Networks in the left-hand menu.

Add wireless network

Click CREATE NEW WIRELESS NETWORK to navigate to the wireless network creation menu.

Create wireless network

In the new user interface

In the new user interface, navigate to Settings and then select WiFi on the left-hand menu.

Wifi new

Click Add New WiFi Network to be navigated to the wireless network creation menu.

Wireless network new

Guest control settings

The controller's innate Guest Control settings will equip you with the ability to create a simple captive portal to be applied to your wireless networks.

In the old user interface

Navigate to the Guest Control settings via Settings -> Guest Control. In the Guest control settings you will find the Guest Policies and Portal Customization settings.

Guest control

In the new user interface

Navigate to the Settings menu, and then select the WiFi settings. In the WiFi settings menu you will find the Add New Guest Hotspot button. In the Guest Hotspot creation menu you will find the Guest Policies and Portal Design settings.

Wifi new Guest control new

Integrations

Our controllers are configured for compatability with leading Captive Portal and Guest WiFi solutions. For integrations requiring the uploading of custom files to the server directories, please get in touch with the Hubox Support team.

UniFi documentation

For queries falling outside of the scope of this documentation, we recommend deferring to the official UniFi documentation, of which can be found here.

For all other queries, please contact Hubox Support.